10 min to read
dPhish CTF | Final Phase Writeup
CTF challenge [write-up]
The final phase of the dPhish CTF focuses on investigating a realistic phishing campaign through a compromised internal account. The challenge environment contains 1,002 emails, with clues distributed across email metadata, attachments, URLs, IOCs, detection results, and response actions.
This write-up walks through the investigation step by step, showing how to use dPhish Discover to pivot between these artifacts, uncover the attack chain, and solve all 20 questions.
Before diving into the challenges, here is a quick overview of Discover, the platform used throughout this CTF.
Discover is a Phishing Detection & Response (PDR) solution that provides visibility across inbound, outbound, and internal emails, as well as phishing attacks delivered through browsers and WhatsApp.
Its key strength is the Detailed-Oriented Object, which provides deep analysis of emails, attachments, URLs, and their observables. This enables flexible Logical Detection Rules and different detection use cases. The Graph View helps visualize relationships between entities, making it easier to pivot and scope an attack.
Discover also combines NLU Classification, Machine Learning, and Threat Intelligence to identify suspicious activity and IOCs. Integrations with email gateways such as FortiMail, O365, Exchange, and Symantec allow response actions to be executed directly, while Playbooks provide automated response capabilities similar to SOAR.
With that in mind, let’s start investigating the environment and solve the challenges.
You can follow the challenge questions and solve them directly from the dPhish platform.
given a dPhish CTF environment containing 1,002 emails.
Lets analyse the environment and answer the questions…
Q1. The compromised account
One internal account sent password-reset / IT emails to a large number of employees. In the Graph View, find the Person node with an unusually high number of outgoing ‘Sent’ edges.
Submit the full email address of that account.
Answer:
Start by opening the Hunting tab and checking the total number of emails. There are 1,002 emails in the environment.
Next, open the Graph View tab.
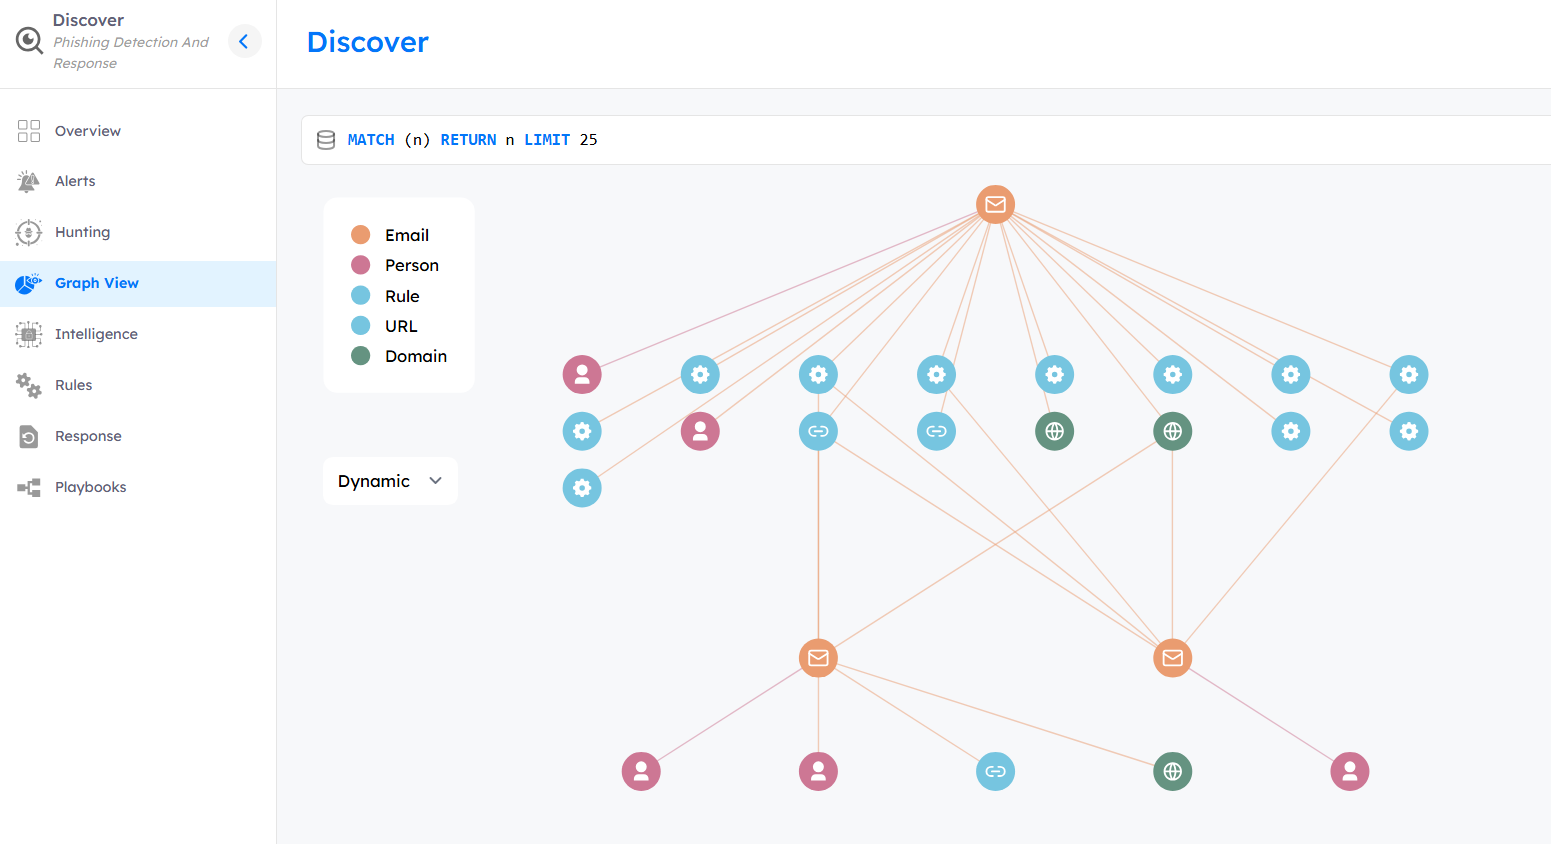
The graph contains several entity types, including Email, Person, Rule, URL, and Domain.
The default query shown at the top is:
MATCH (n) RETURN n LIMIT 25
This is a Cypher query, the query language used by Neo4j to work with graph data, but you can solve the challenge without it.
Increase the query limit from 25 to 1000 and filter the results to show only Email and Person entities.
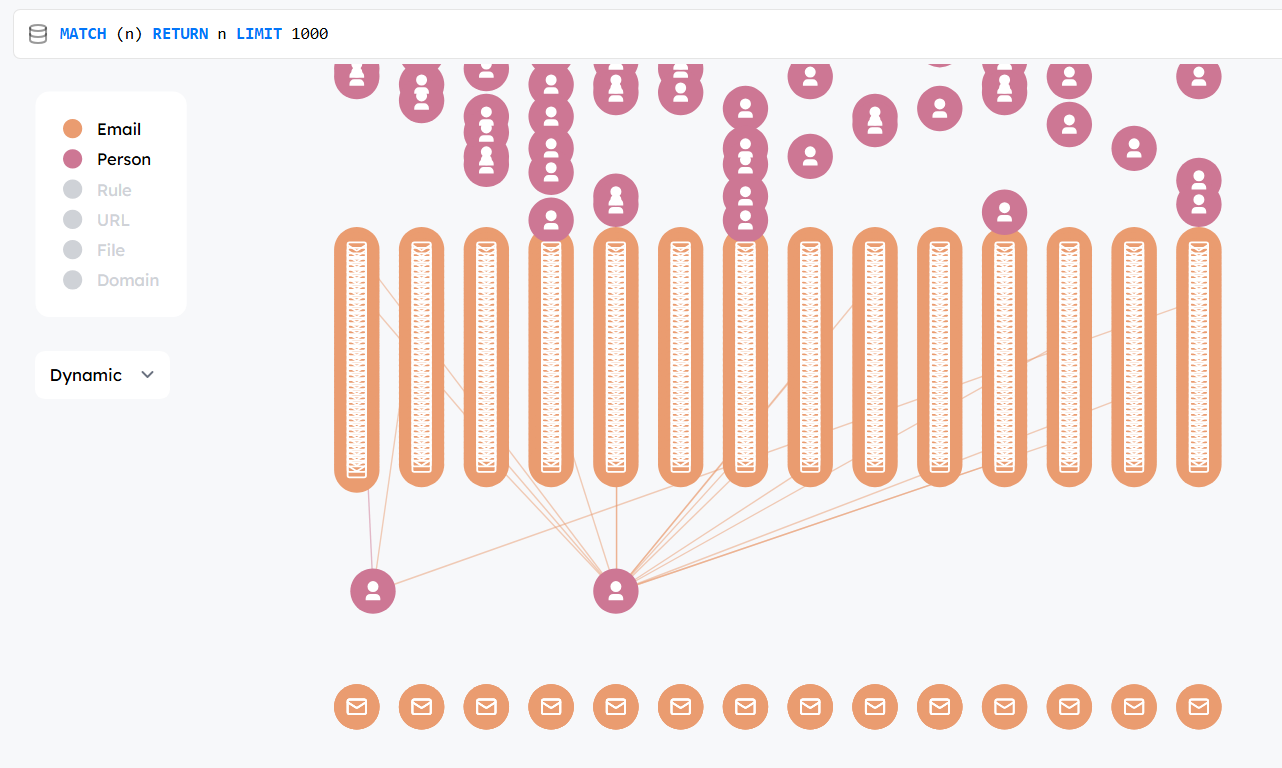
Two Person entities stand out based on their email relationships:
- george.perez@vector.com : has a large number of associated emails.
- william.smith@vector.com : has a smaller number of associated emails.
The question specifically refers to password-reset / IT emails, so search for relevant terms such as Password, IT, and Account.
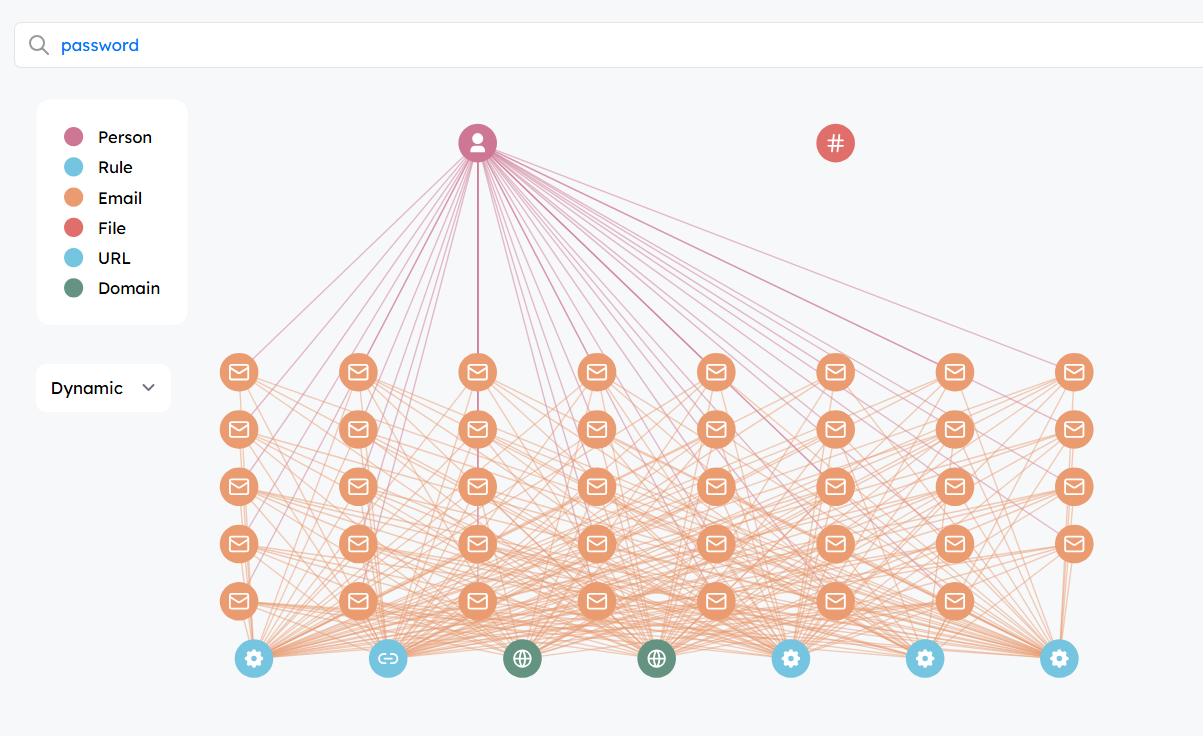
The results identify william.smith@vector.com as the account that sent the password-reset emails to employees.
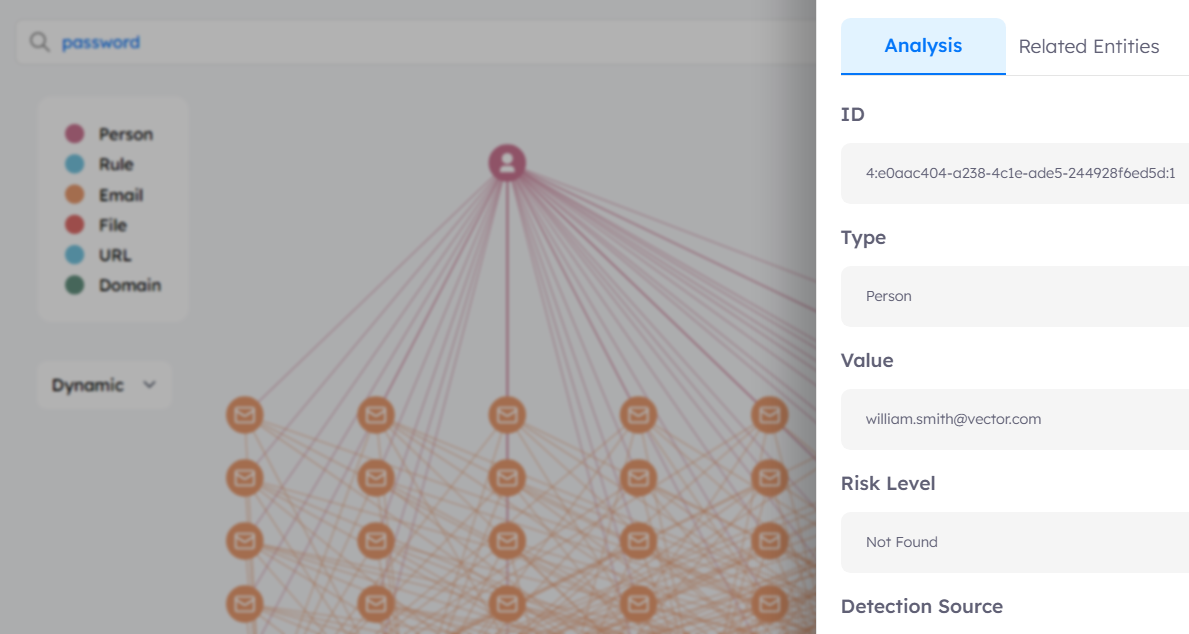
And this is the 1st flag.
Q2. Display name
Open any of the malicious emails from that account. What display name does it use in the ‘From’ field?
Answer:
Open any of the malicious emails sent from the account identified in Q1 and inspect the From field.
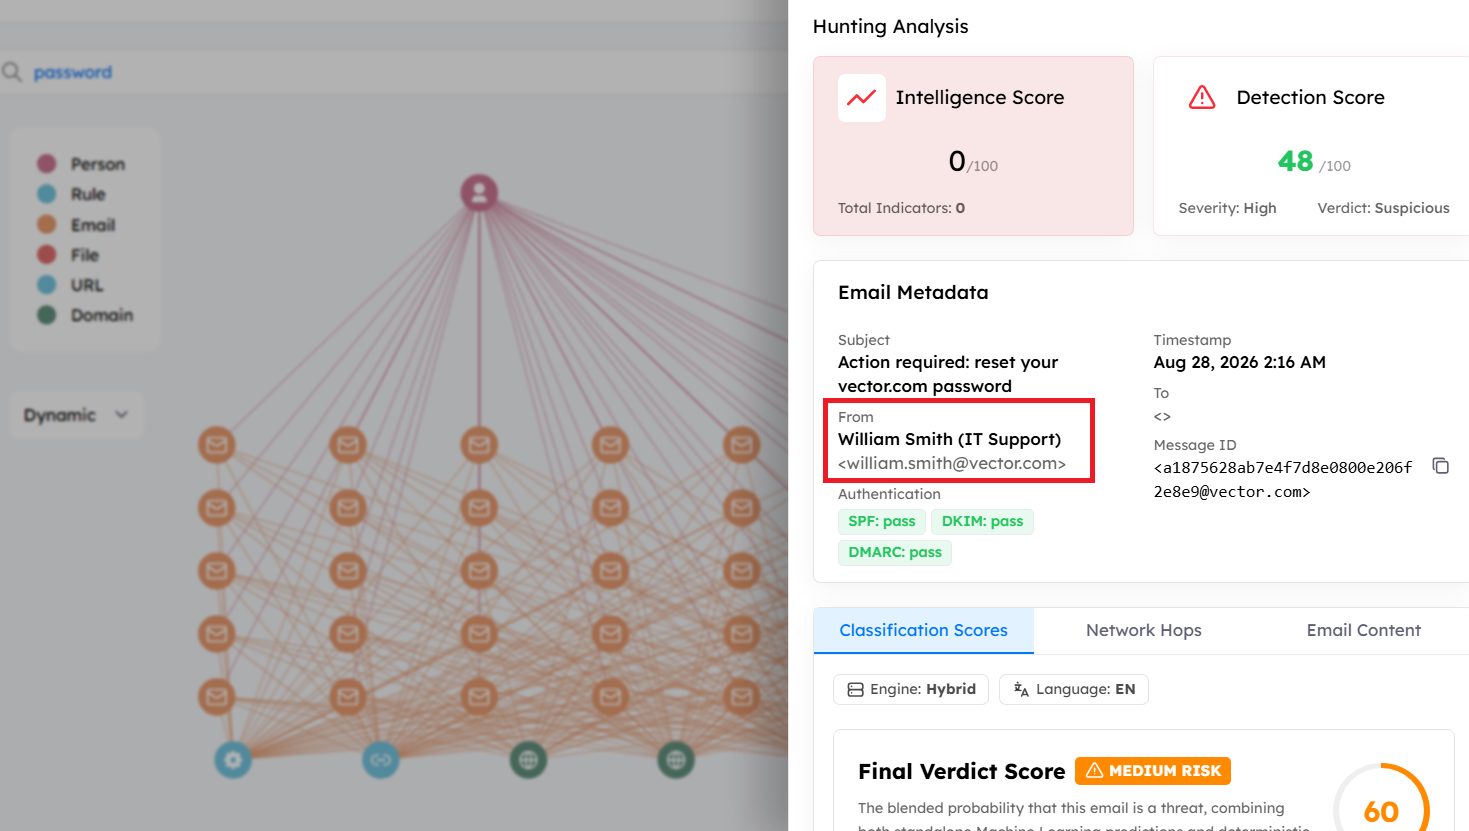
The question asks for the display name only which is: William Smith (IT Support)
Q3. Email authentication
Check the Authentication-Results header of the lure emails. Did they PASS or FAIL SPF/DKIM/DMARC?
(This is the key insight: the mailbox is a real, compromised account, so authentication passes.)
Answer:
From the same email, inspect the Authentication-Results header.
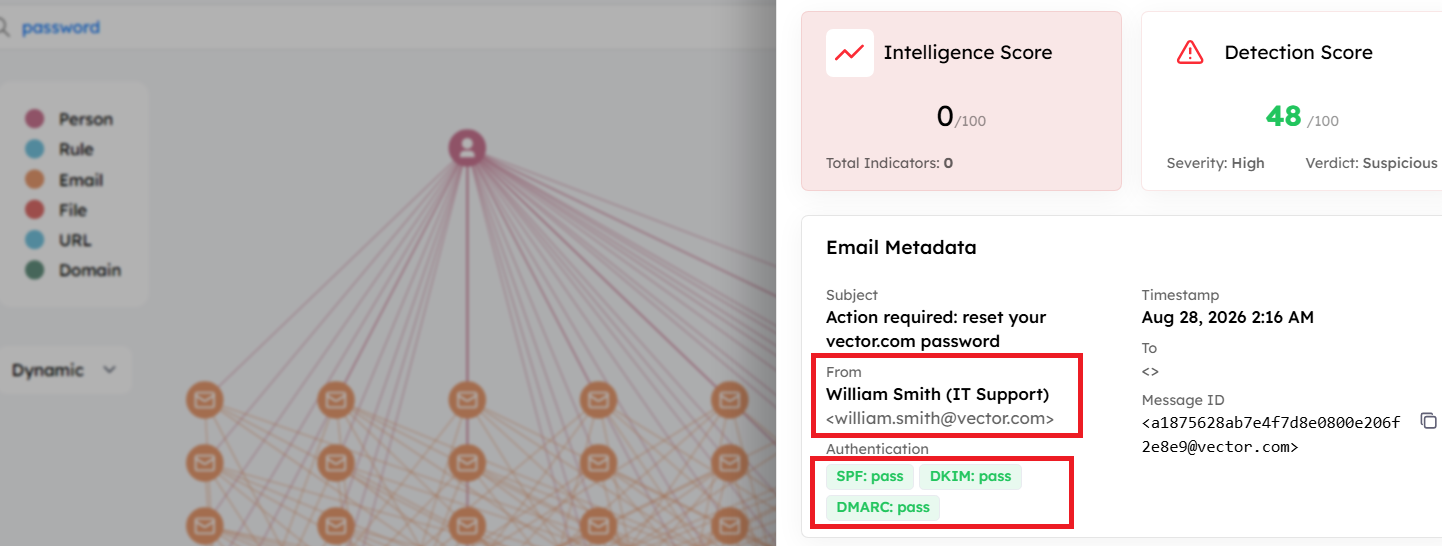
The authentication results show that the email passed the relevant authentication checks so the flag is pass.
Q4. First email time
Find the earliest phishing email sent by this account. Based on its created_at timestamp, when was it sent?
Answer format: Day, DD Mon YYYY HH:MM:SS
Answer:
Move to the Hunting tab and search for the sender identified in Q1:
william.smith@vector.com
The search supports both direct values and KQL (Kibana Query Language) queries.
Use the following query:
from: william.smith@vector.com
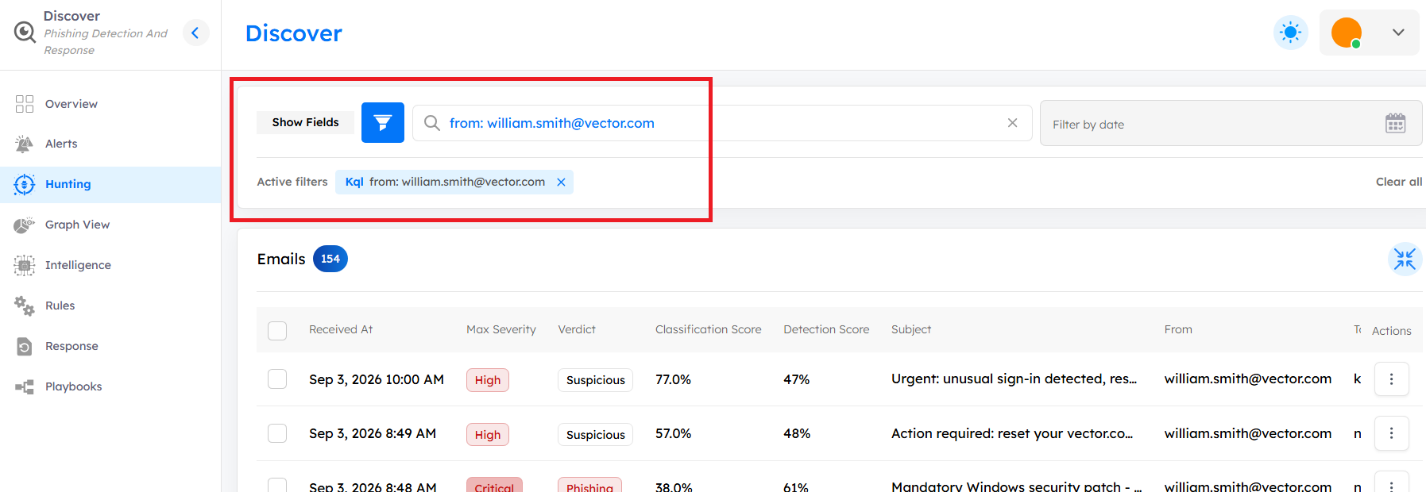
The search returns 154 emails.
Since the question asks for the earliest phishing email sent by this account, navigate to the last page of the results and inspect the oldest email.
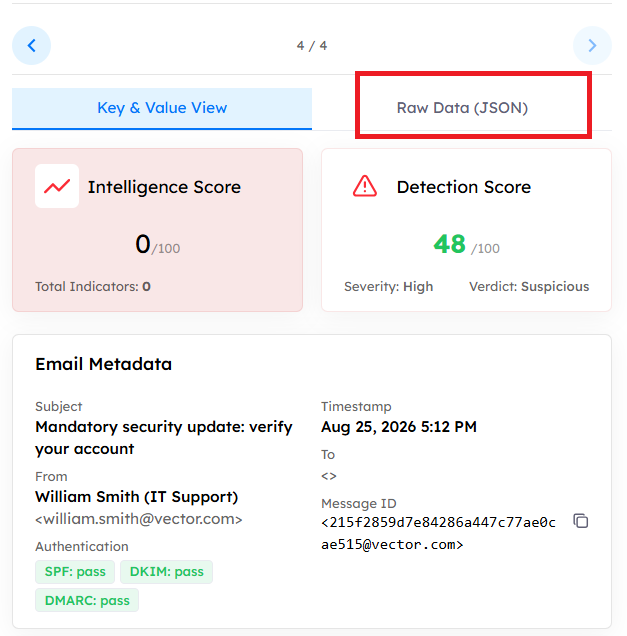
The question specifically asks for the value of the created_at field. Open the email’s Raw Data (JSON) view and locate this field.
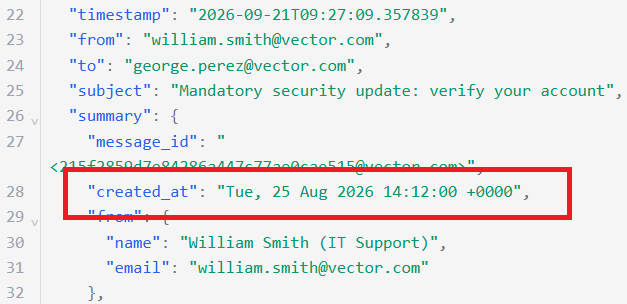
The value is:
Tue, 25 Aug 2026 14:12:00 +0000
Q5. Origin IP
The lure emails were sent by an attacker operating the mailbox remotely. From the IP Address node (or the Received / X-Originating-IP header), what IP address were they sent from?
Answer:
From the same email, inspect the hops header to identify the sender’s IP address.
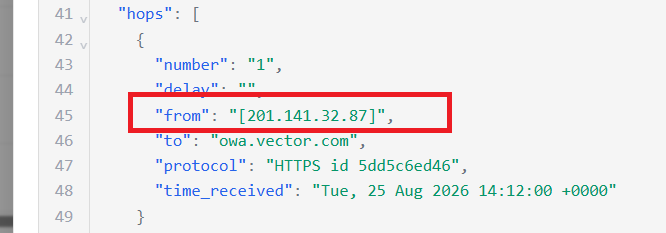
The origin IP address is:
201.141.32.87
Q6. Origin country
Geo-locate that IP address. Which country does it belong to?
Answer:
Use Discover’s built-in IP information or an external IP geolocation service to determine the country associated with the IP address.
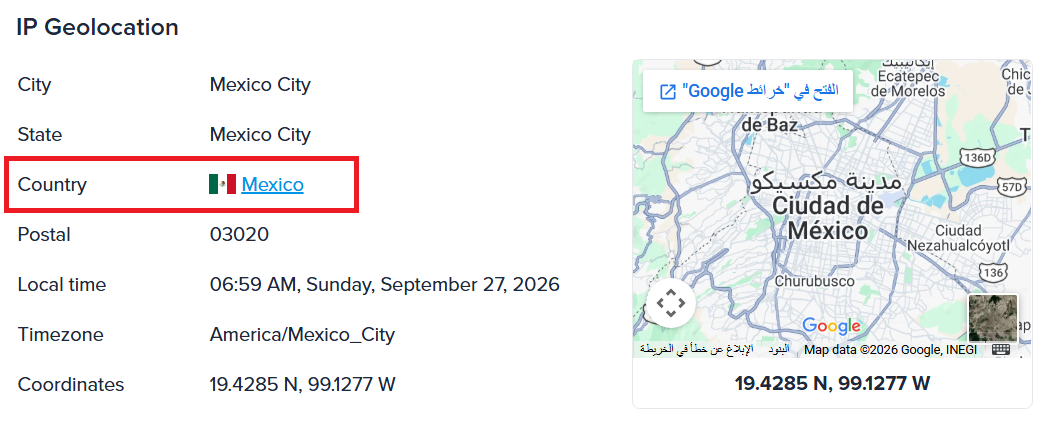
So, Mexico is the answer for this question.
Q7. First recipient
Who received that very first phishing email? Submit the full email address.
Answer:
Open the earliest phishing email identified in Q4 and inspect the To field.
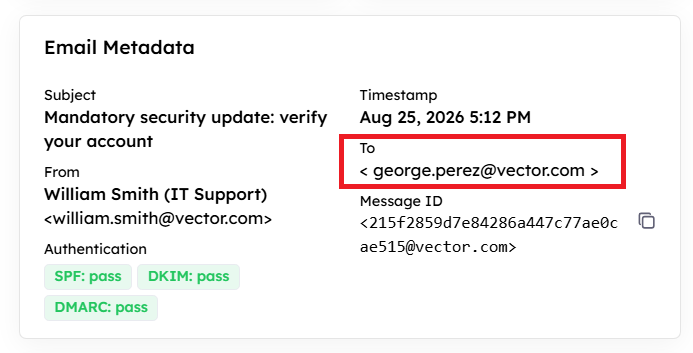
The recipient is:
george.perez@vector.com
Q8. First email URL
Open the first phishing email and follow it to its URL node. What is the full malicious link inside it?
Answer:
From the same email, open the Raw Data (JSON) view and inspect the urls field.
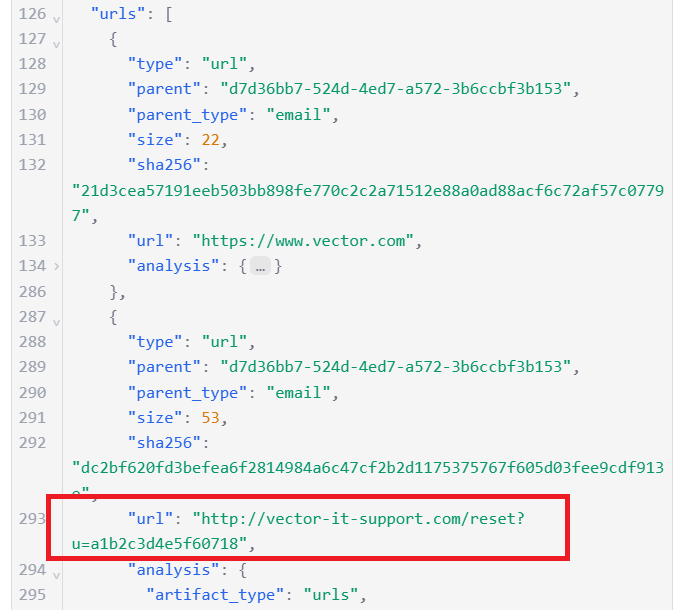
The malicious URL is:
http://vector-it-support.com/reset?u=a1b2c3d4e5f60718
Q9. First email domain
Which domain does that URL point to?
Answer:
Extract the domain from the URL identified in Q8 which is vector-it-support.com.
Q10. Number of malicious domains
Across all the malicious links, how many DISTINCT look-alike domains are used? Submit a number.
Answer:
There are several ways to identify the look-alike domains. One approach is to search for the subject of the phishing email in the Graph View and display only the Email and Domain entities.
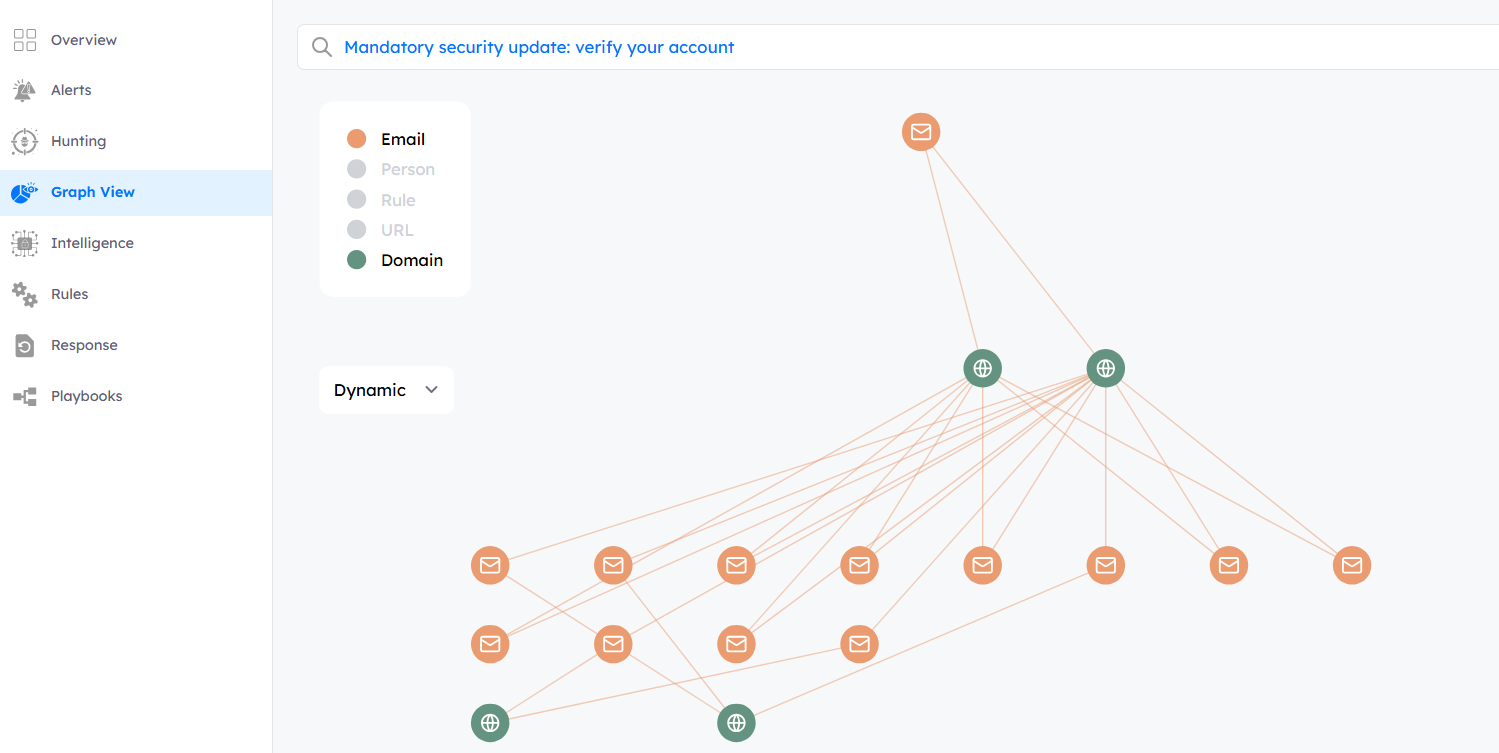
The results show four domains:
- www.vector.com
- vector-it-support.com
- vector-secure-reset.com
- vectorhelpdesk-online.com
The question asks specifically for distinct look-alike domains, so the legitimate www.vector.com domain should not be counted.
The other look-alike domains are:
- vector-it-support.com
- vector-secure-reset.com
- vectorhelpdesk-online.com
Therefore, the flag is: 3
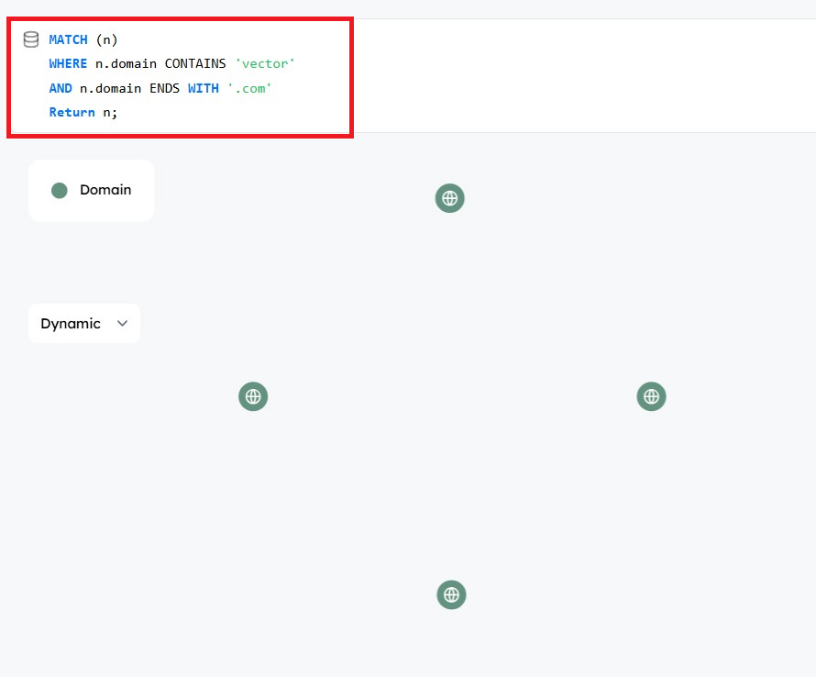
Other approach is depending on writing Cypher Query to get the look-alike domains.
Cypher Query:
MATCH (n)
WHERE n.domain CONTAINS ‘vector’
AND n.domain ENDS WITH ‘.com’
Return n;
The result is the domains.
Q11. The other look-alike domains
Besides the primary domain, name the OTHER two look-alike domains.
Answer format: all values on one line, in alphabetical order, comma-separated, no spaces (e.g. alpha,beta)
Answer:
From the previous question, exclude the primary domain vector-it-support.com and keep the remaining two look-alike domains:
- vector-secure-reset.com
- vectorhelpdesk-online.com
Following the required answer format, the flag is:
vector-secure-reset.com,vectorhelpdesk-online.com
Q12. Reply-To collection address
For the earliest phishing email, what classification explanation is shown in the Rule Engine Explanations?
Answer:
Return to the earliest phishing email sent by William Smith and locate the Rule Engine Explanations section.
This information is available under the Classification section of the email view in the Hunting tab.
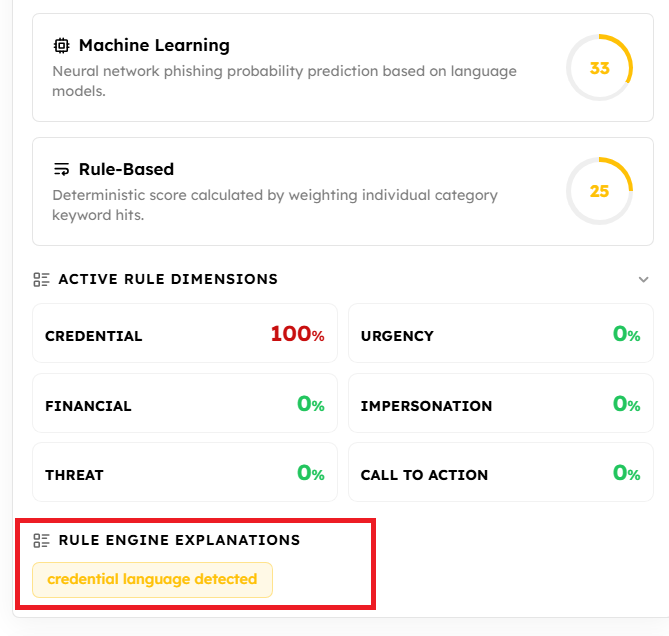
The classification explanation is: credential language detected
Q13. Malicious script filename
Shortly after the first email, the account sent a mail asking recipients to run an attached ‘updater’ script. What is the filename of that .ps1 attachment?
Answer:
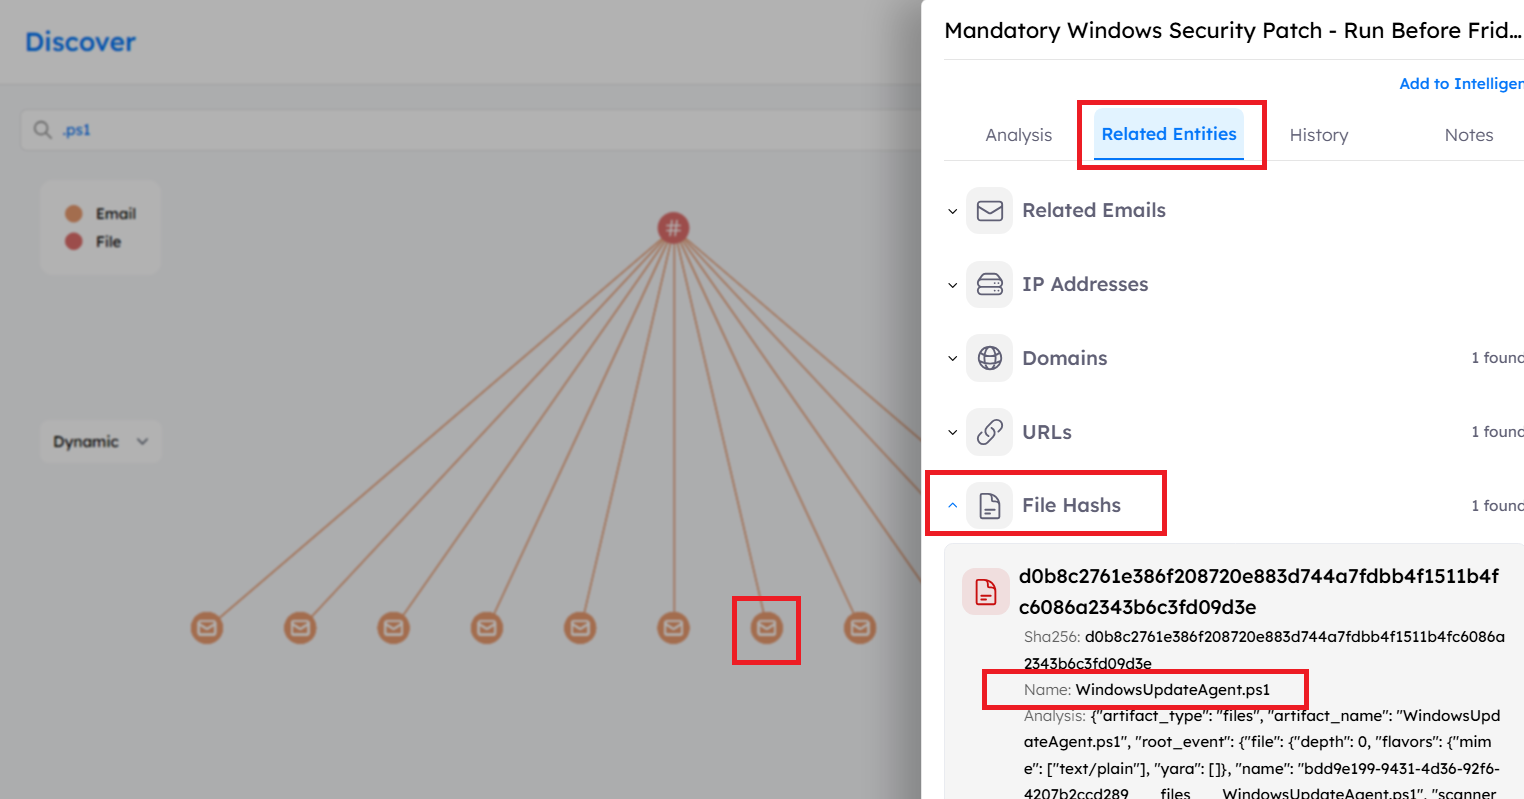
Identify the PowerShell attachment using either the Graph View or Hunting tab.
From the Graph View, open an email and inspect its associated File entities.
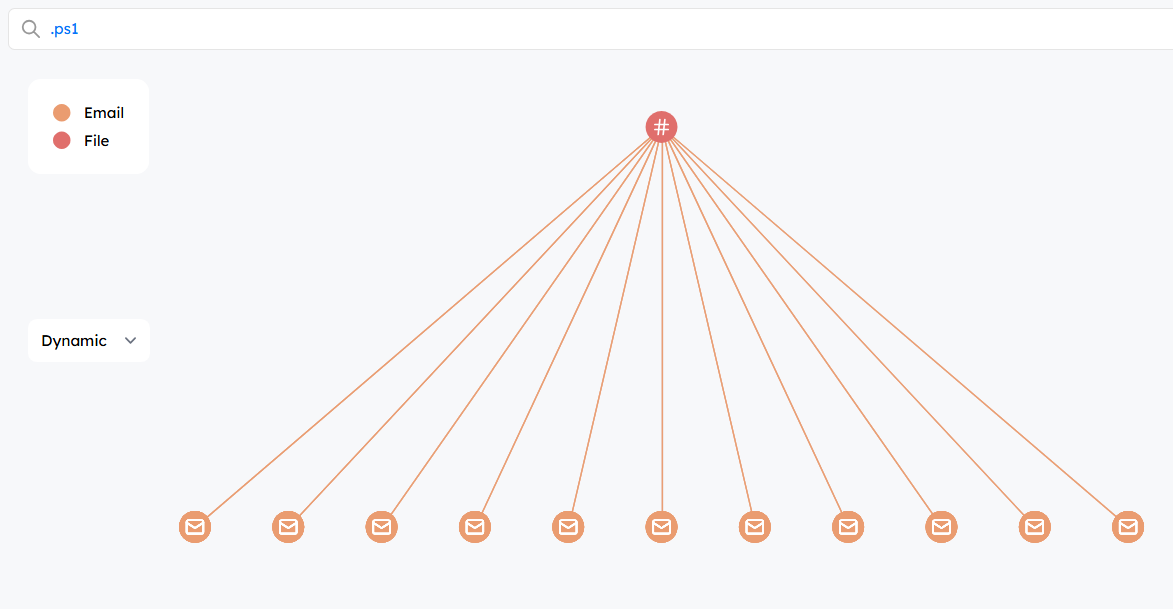
Click on any email and check files entities:
Alternatively, use the following query in the Hunting tab:
files.filename:*.ps1
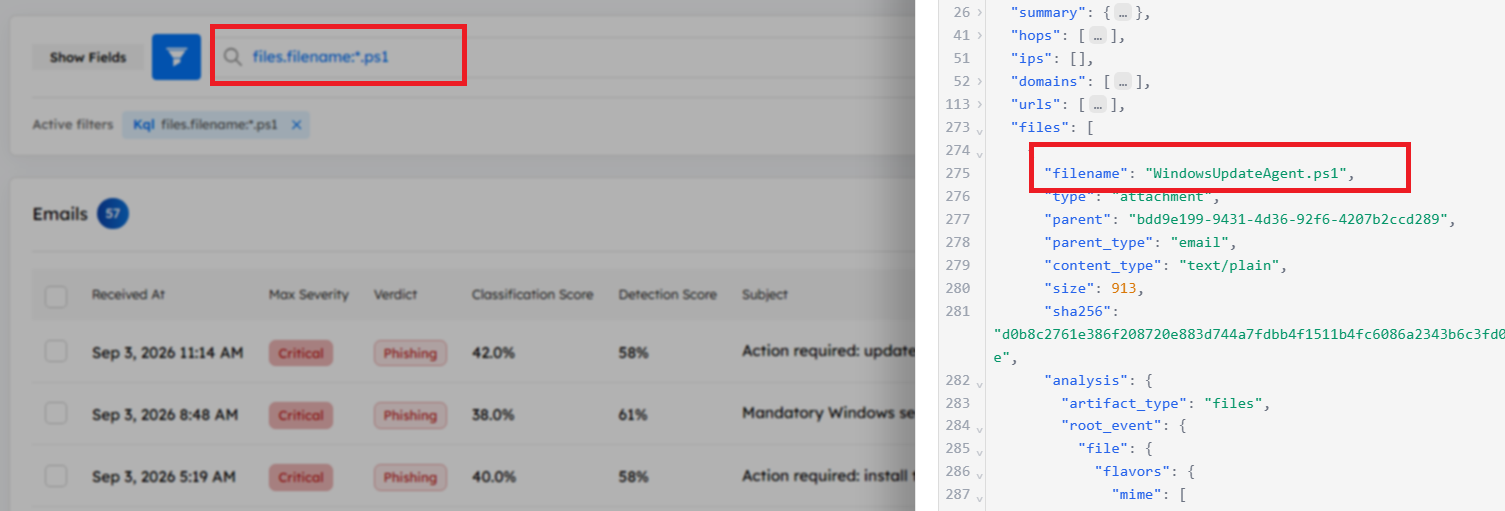
So, the filename is: WindowsUpdateAgent.ps1
Q14. Script MD5
Open the File Hash node for that script. What is its MD5 hash?
Answer:
Open the same email in either the Graph View or Hunting tab.
Navigate to the Key & Value View, then scroll to the File Analysis section. Then locate the Hash scanner to view the file hashes.
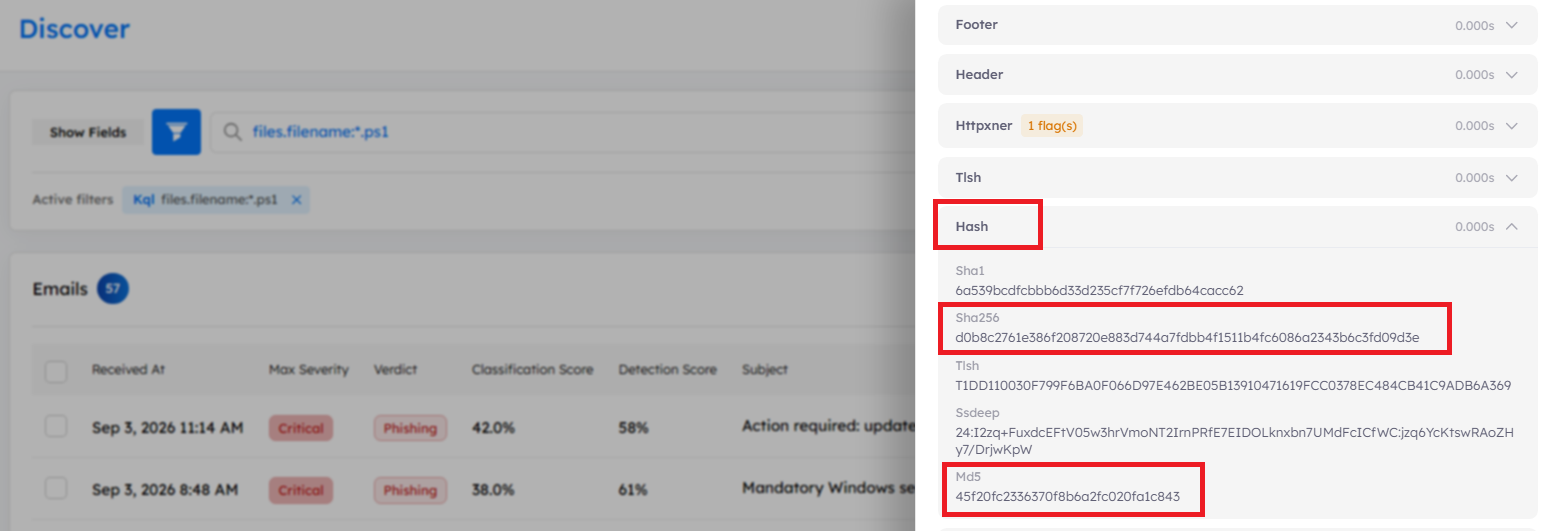
The MD5 hash is: 45f20fc2336370f8b6a2fc020fa1c843
Q15. Script SHA256
What is the SHA256 hash of that same script?
Answer:
Use the same File Analysis section described in Q14 and locate the SHA256 value.
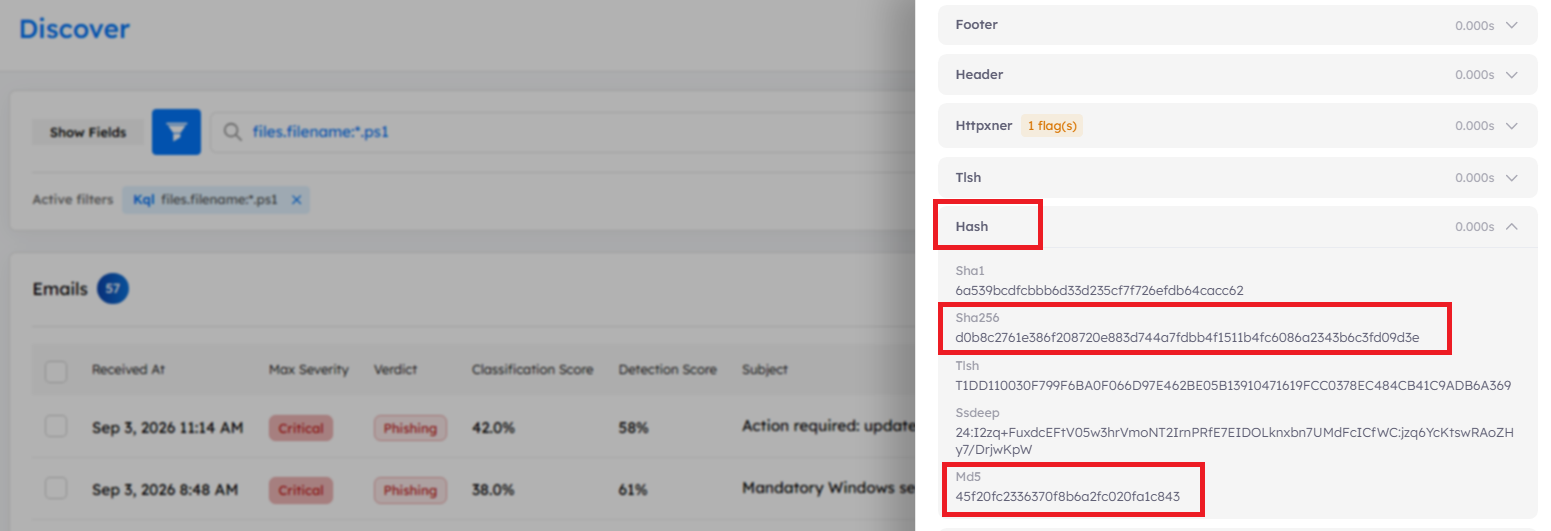
The SHA256 hash is: d0b8c2761e386f208720e883d744a7fdbb4f1511b4fc6086a2343b6c3fd09d3e
Q16. Script capability
Review the suspicious YARA rule matches for the script. What suspicious YARA rule was triggered?
Answer:
In the File Analysis section, scroll down to the Yara scanner and inspect the Matches section.
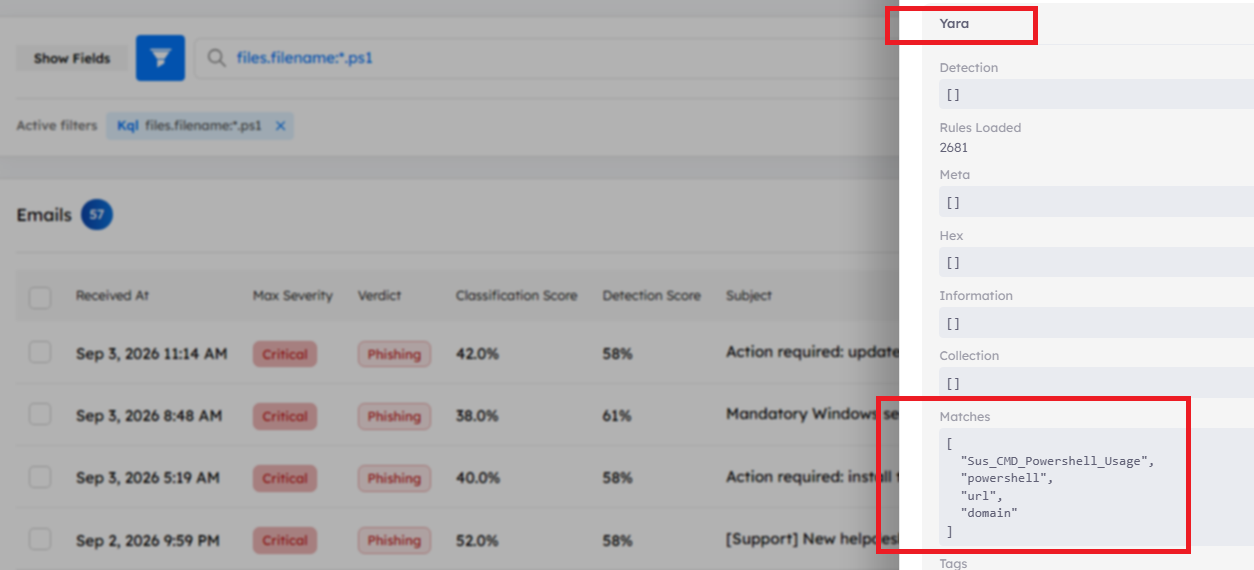
The suspicious YARA rule that was triggered is: Sus_CMD_Powershell_Usage
Q17. Detection rule
Attachments matching a YARA rule are detected by a specific Detection Rule. What is the name of that Detection Rule?
Answer:
The goal is to identify the Detection Rule responsible for detecting attachments that match a YARA signature.
Open the email containing the PowerShell script identified in Q13 and inspect its Raw JSON Data. From the Hunting tab:
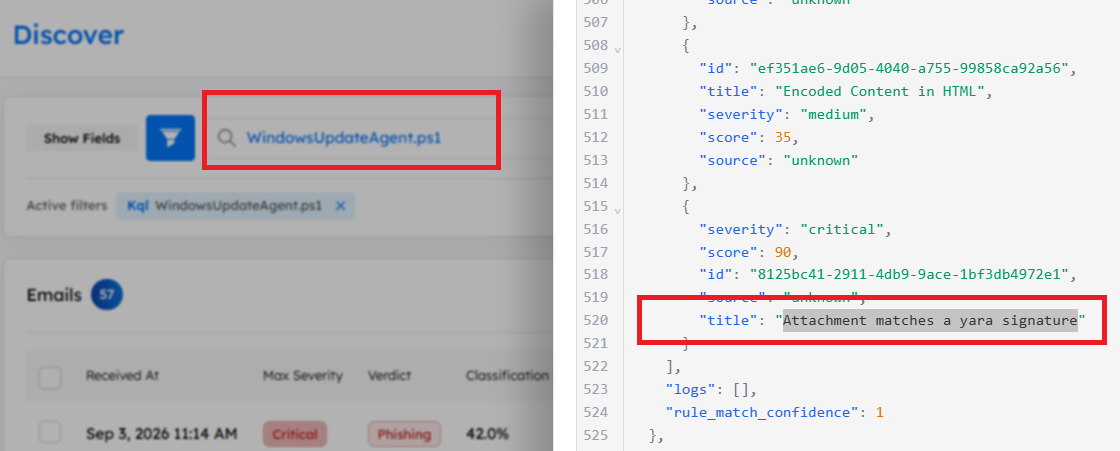
Alternatively, search for Yara in the Rules tab.
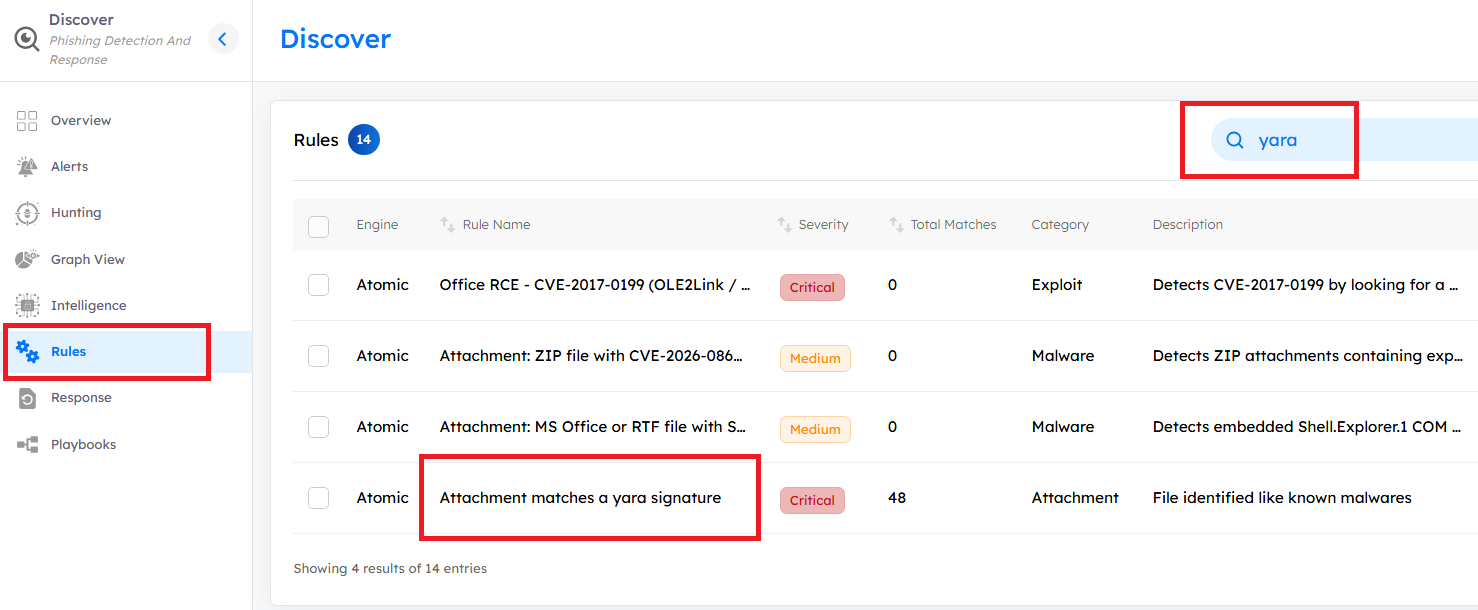
The Detection Rule is: Attachment matches a yara signature
Q18. Reply-To count
The attacker used an email address to collect victims’ replies, which was later added to the TIP as an IOC. How many emails contain this address in their Reply-To field? (Submit a number)
Answer:
Open the Intelligence tab and search for the IOC associated with the attacker’s reply-collection address.
Since the attacker used multiple domains and URLs to impersonate vector.com, filter by Type: Email and search for vector.
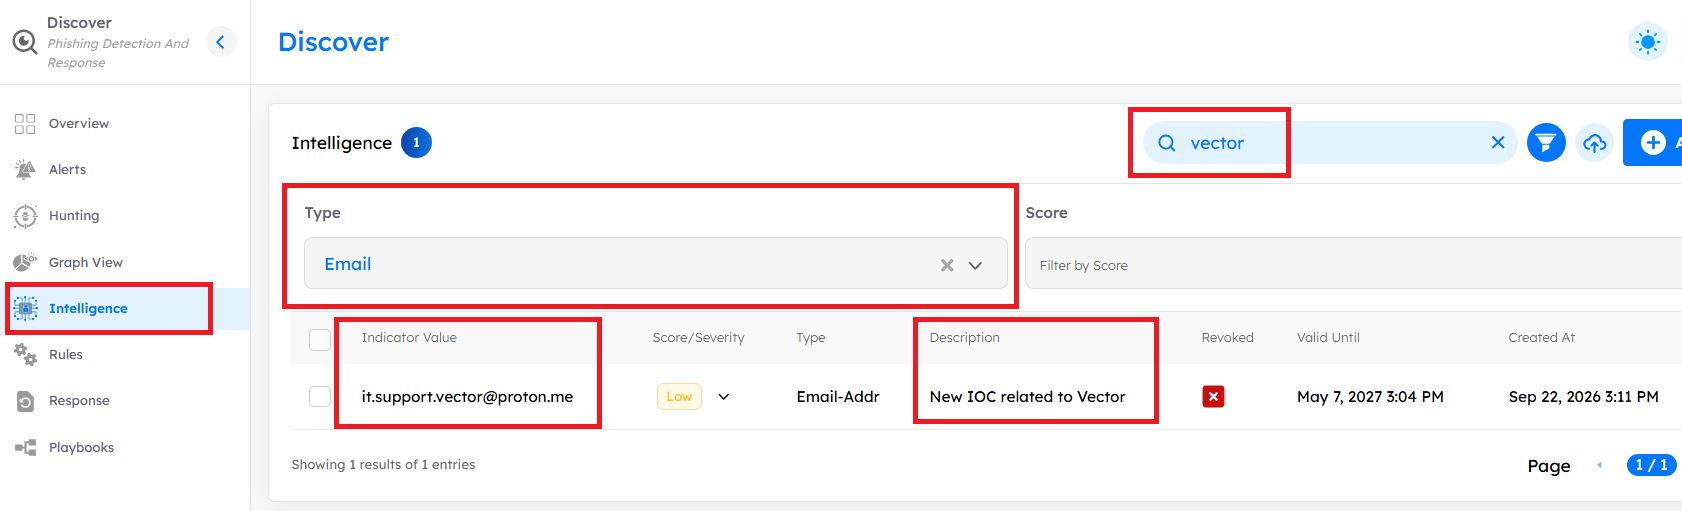
The identified email address is: it.support.vector@proton.me
Next, search for this address in either the Graph View or Hunting tab to determine how many emails contain it in their Reply-To field.
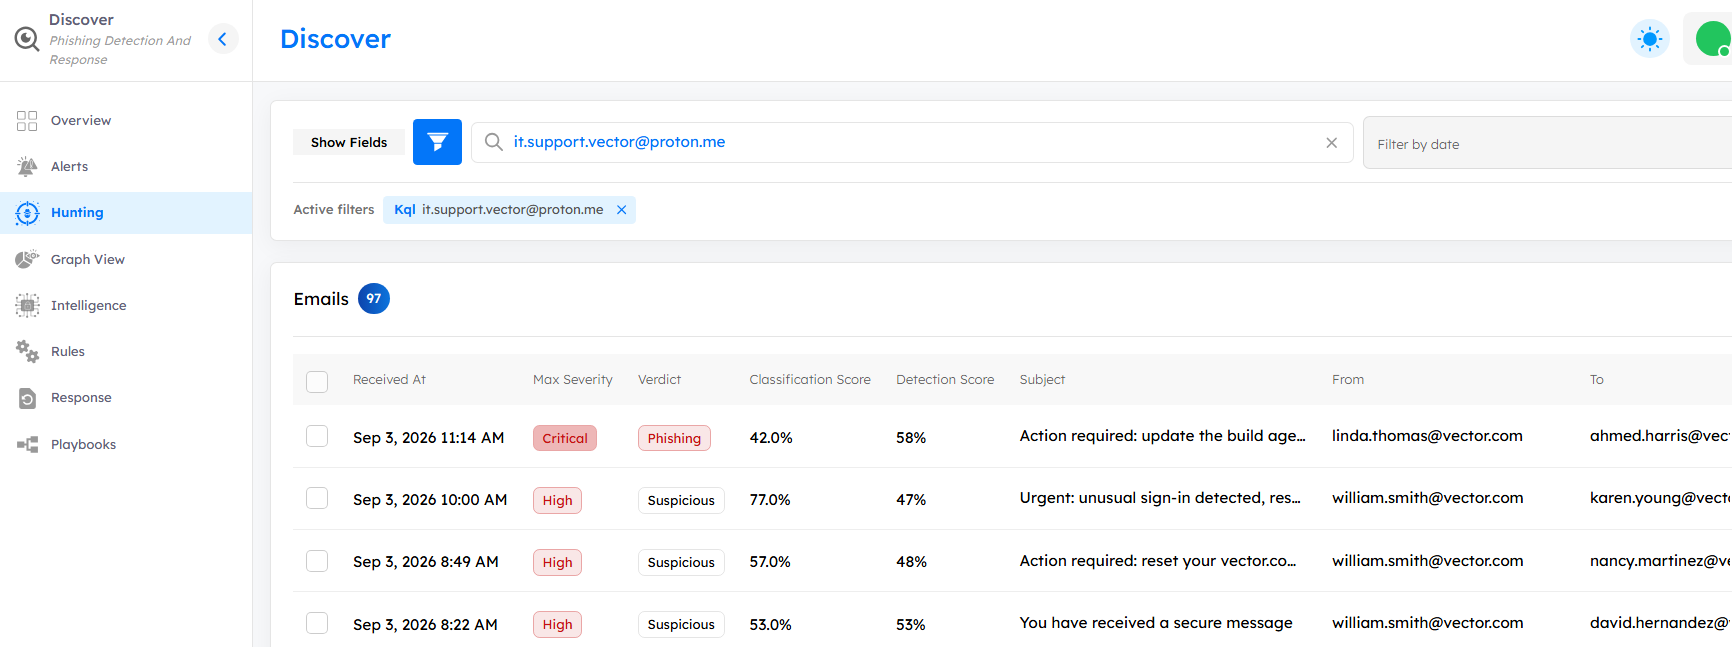
The search returns 97 emails containing this Reply-To address.
Q19. Response modules
Across how many Response Integration Modules were Response Actions executed? (Submit a number)
Answer:
Open the Response tab and identify the Response Integration Modules where Response Actions were executed.
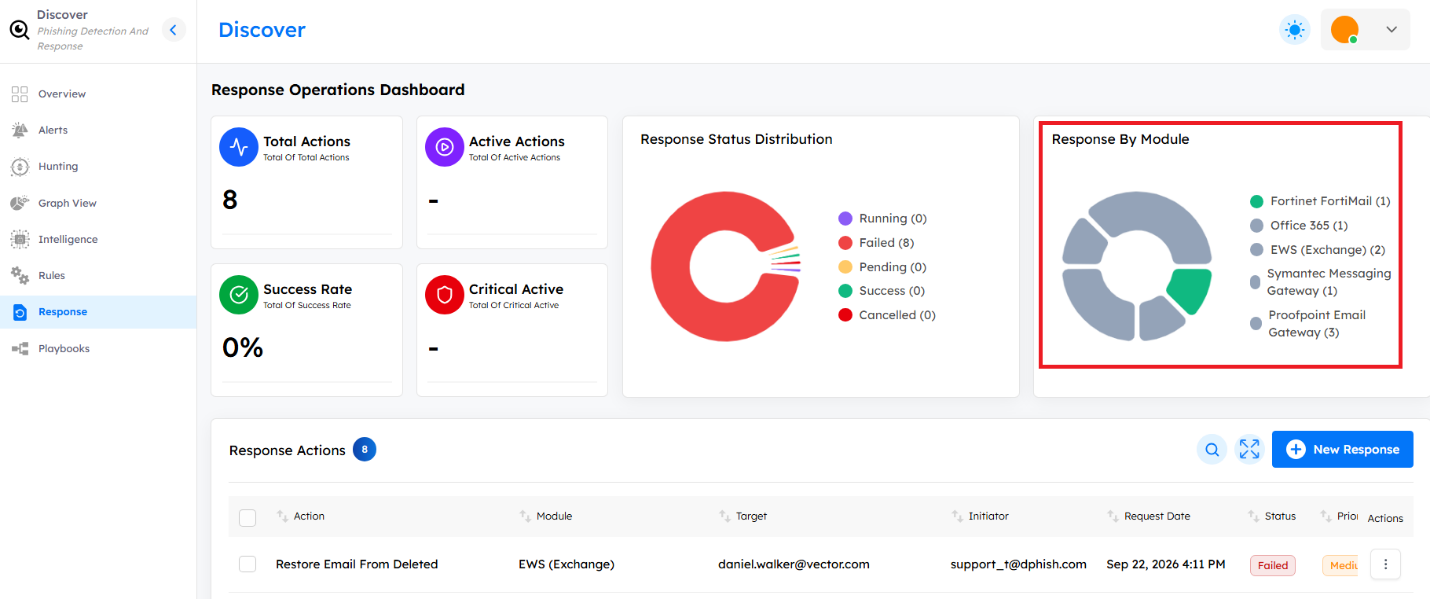
The five modules are:
- FortiMail
- O365
- Exchange
- Symantec
- Proofpoint
Therefore, the number of Response Integration Modules is: 5
Q20. Capture the flag
The flag is hidden in the body_text of one of the emails. Can you find it among the many emails and recover the flag? Flag format: CTF{...}
Answer:
Since the flag starts with CTF, searching for CTF in the Hunting tab may return multiple emails.
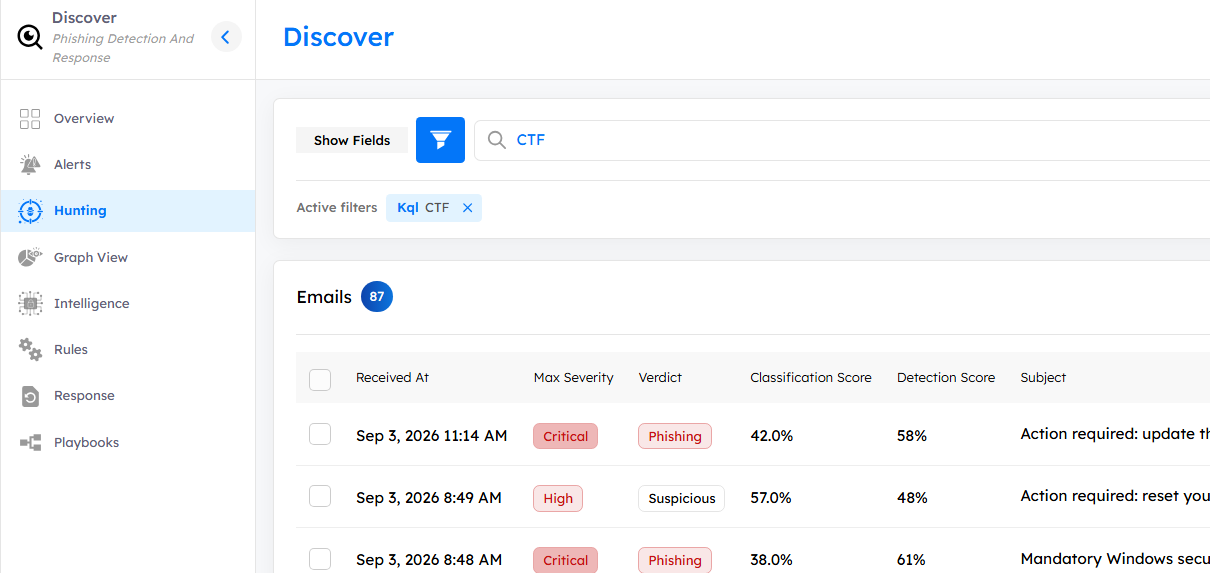
The question specifically states that the flag is located in the body_text field. Narrow the search by using the following query:
body_text: CTF
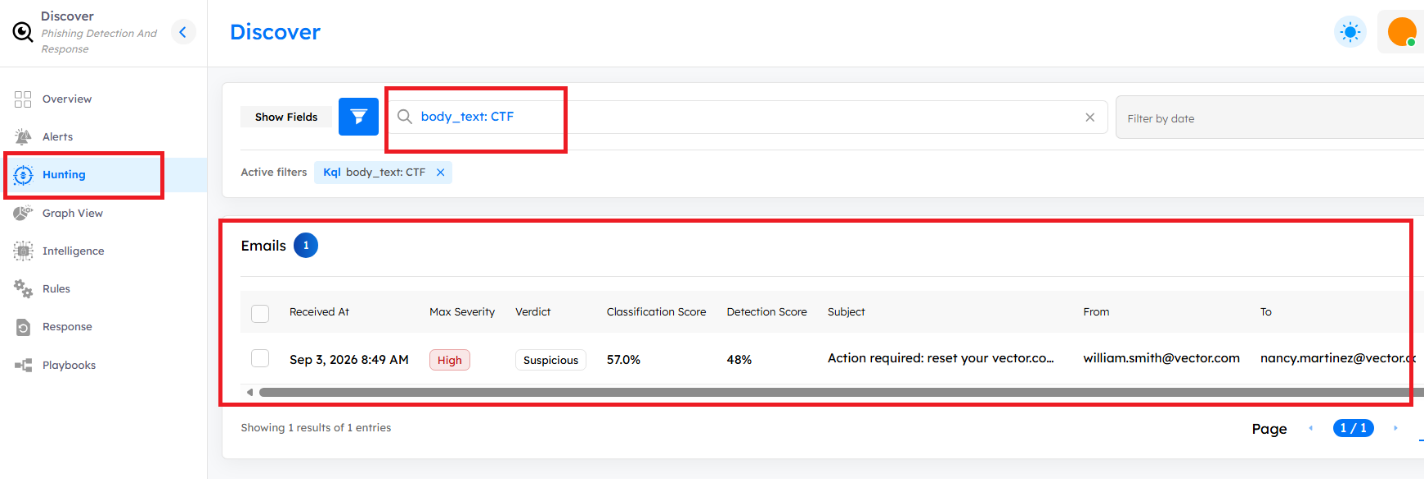
Open the matching email to view its content and recover the flag from the body text.
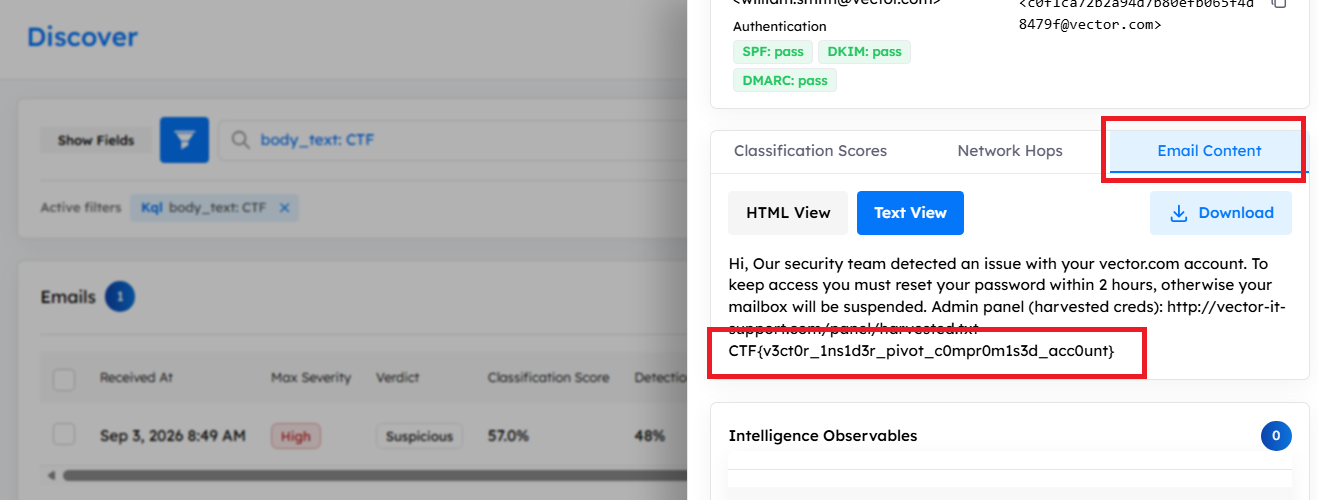
The flag is: CTF{v3ct0r_1ns1d3r_pivot_c0mpr0m1s3d_acc0unt}
Thanks for reading.